|
|
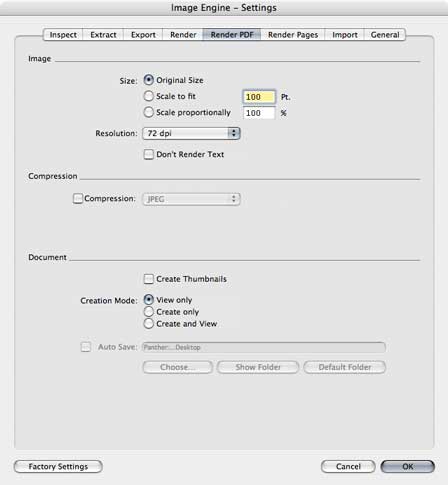 6. Settings 6. Settings
6.5. Render PDF
6.5.1. Image
Size: Use these radio buttons to set the size the images.
- Use "Original Size" to generate all images in their original sizes. For images this means the pixel size, for pages this means the size of Media Box of the page.
- Use "Scale to fit" to generate all images in sizes that are scaled to fit the longest side of the image to the given value.
- Use "Scale proportionally" to generate images in sizees that are scaled proportionally to the given value.
Dont't Render Text: Use this option to exclude text elements of the pages from conversion into the page image. The text elements of the pages are available in the destination document in the same way as in the source document.
Resolution: This menu allows the user to set the resolution of the images.
When exporting or rendering images, the resolution can either be calculated from the source image (relationship of the image size and the image box size) or assigned to one of the fixed values from the pop-up menu.
To render pages, the resolution can be assigned to one of the values from the pop-up menu only.
6.5.2. Compression
To enable compression of the generated images, check the Compression checkbox. Depending from the compression method, some additionally settings may occure.
The text field shows the currents settings.
6.5.6. Document
Create Thumbnails: If this option is on, ImageEngine automatically creates the thumbnails.
Creation Mode: Use the radio buttons to set, how the PDF document will be generated.
- Use "View only" to generate a temporary document. The document will be displayed in a new front window as soon as all steps of the generation are successfully accomplished. This temporary document can be saved later, e.g. using the menu "File" –> "Save As…"
- Use "Create only" to generate a permanent document. The document will be saved as PDF file as soon as all steps of the generation are successfully accomplished, however it will not be displayed.
- Use "Create and View" to generate a permanent document. The document will be saved as PDF file as soon as all steps of the generation are successfully accomplished, and will also be displayed in a new front window.
Auto Save: allows to save files in a specified destination without showing the Save As… dialog.
The default destination is the Desktop.
- Use the "Choose…" button to assign any other then the default folder as Auto Save destination.
- Use the "Show Folder" button to open the actually assigned folder in a Finder window.
- Use the "Default Folder" button to assign the default destination.
It is also possible to use Drag & Drop to assing a destination. Drag a folder or volume from a Finder window and drop it nearby the Auto Save checkbox.
 |
|